1. Understanding Sewer Camera and Locator Basics
A sewer camera allows you to visually inspect the interior of pipes, helping you identify potential issues like blockages, corrosion, or root intrusion. The camera is attached to a flexible cable that can be inserted into pipes, transmitting real-time video to a monitor for detailed inspection.
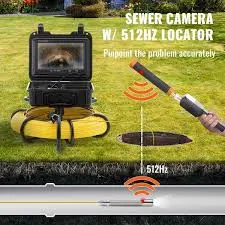
A sewer locator works in conjunction with the sewer camera, enabling you to pinpoint the exact location of issues identified by the camera. The locator detects the signal sent by the camera’s cable and helps you identify the problem's precise location within the plumbing system.
| Tool | Function | Use in Pipe Maintenance |
|---|---|---|
| Sewer Camera | Visual inspection of pipes using real-time video | Identifies blockages, corrosion, and leaks |
| Sewer Locator | Pinpoints the location of issues detected by the camera | Helps reduce unnecessary digging for repairs |
2. Steps to Use a Sewer Camera for Pipe Inspection
Using a sewer camera correctly can help you detect problems without the need for costly manual inspections or invasive digging. Here’s how to use it effectively:
1. Prepare the Camera
- Check the camera lens for cleanliness and ensure it’s functioning properly.
- Ensure the monitor is securely connected and powered on for clear visibility.
2. Insert the Camera into the Pipe
- Slowly feed the camera into the pipe through the clean-out or any other accessible entry point.
- Guide the camera along the pipe while ensuring the cable is free of obstructions.
3. Inspect the Pipe Interior
- Watch the real-time footage on the monitor to look for signs of damage, such as cracks, rust, or root intrusion.
- Record any issues for later reference or for providing recommendations to your clients.
4. Pull the Camera Back
- Slowly retract the camera from the pipe while monitoring the footage to ensure that you don’t miss any details.
- Note any areas of concern for further examination or repairs.
3. Steps to Use a Sewer Locator for Pipe Mapping
Once you’ve inspected the pipes with a sewer camera, you can use the sewer locator to find the exact location of the problem. Here’s how to use a sewer locator efficiently:
1. Turn on the Locator
- Power up the locator and ensure it's set to the correct frequency (most locators use 512 Hz for pipe detection).
- Attach the receiver to the camera’s cable if necessary.
2. Move the Locator Receiver Over the Area
- Hold the receiver over the area where you suspect an issue (such as a blockage or crack).
- Move slowly along the area while observing the signal strength and depth indicated on the receiver.
3. Pinpoint the Problem Location
- When the signal becomes the strongest, you've likely found the problem's exact location.
- The locator will show you the depth of the pipe and guide you to the area that needs attention.
4. Benefits of Using a Sewer Camera and Locator Together
Using both the sewer camera and locator together provides a comprehensive approach to pipe maintenance. While the camera helps you visually inspect the interior of pipes, the locator helps you pinpoint the exact location of any issues. This combination allows for targeted repairs, reducing the need for costly and time-consuming excavation.
| Benefit | Sewer Camera | Sewer Locator |
|---|---|---|
| Accurate Diagnosis | Provides visual evidence of the issue | Pinpoints the exact location of the problem |
| Cost Savings | Reduces the need for invasive inspections | Minimizes unnecessary digging |
| Time Efficiency | Speeds up the process of detecting issues | Quickly identifies the location of the problem |
5. Common Pipe Issues Identified with a Sewer Camera and Locator
By regularly using a sewer camera and locator for pipe inspections, you can identify and address common plumbing issues early. These tools can detect the following problems:
1. Blockages
- Foreign objects, grease buildup, or debris can obstruct the flow in pipes.
- A sewer camera will help you see exactly where the blockage occurs, and a locator can pinpoint the exact location for efficient clearing.
2. Pipe Corrosion
- Over time, pipes may deteriorate due to age, water quality, or environmental factors.
- The camera allows you to assess the condition of pipes, and the locator ensures you can focus on the areas that need repair.
3. Root Intrusion
- Tree roots can infiltrate pipes and cause blockages or damage.
- A camera can show root growth inside pipes, and a locator can help find the exact location of root intrusion.
6. Tips for Maintaining Your Sewer Camera and Locator
To ensure the longevity and effectiveness of your sewer camera and locator, regular maintenance is essential. Here are some tips for keeping these tools in top condition:
- Clean the camera lens after every use to maintain clear visuals.
- Check the cable for signs of wear and tear and repair it promptly.
- Test the locator periodically to ensure it’s working at the correct frequency and depth detection.
- Store the tools properly to avoid damage, keeping them in a dry and secure location.
Conclusion
Using a sewer camera and locator is essential for effective and efficient pipe maintenance. These tools help you inspect pipes without the need for invasive digging, saving both time and money. By following the steps outlined in this guide, you can ensure accurate diagnostics, pinpoint the location of issues, and provide precise solutions to your plumbing problems. Regular use of these tools will improve the efficiency and reliability of your plumbing maintenance work.